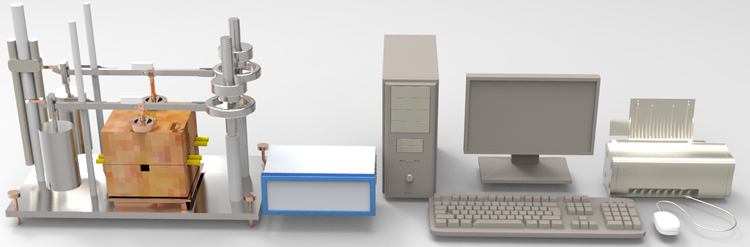
Applicable scope:
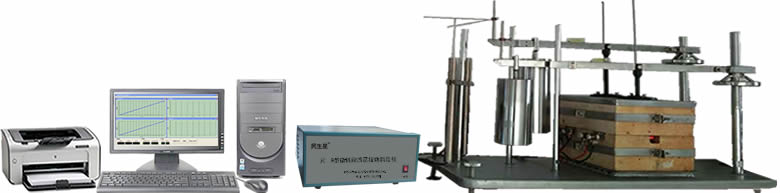
JC-9 type microcomputer glial layer tester adopts humanized design, combined with the computer software control technology, to achieve software automatic measurement, automatic drawing, High measurement accuracy, simple and convenient operation, safe and stable performance, can be widely used in coal, metallurgy, coking and other industries of coal quality testing departments.
It is suitable for measuring the glial layer index of bituminous coal (the maximum thickness of the glial layer Y, the final shrinkage X and the volume curve). Meet the national standard GB/T479 “bituminous coal gelatinous layer index determination method” requirements.
Features:
1. High degree of humanization Computer graphics software is used to control the real-time control system of single chip microcomputer, which automatically controls the heating rate according to the national standard requirements, automatically records the coal coke shrinkage curve and X value, inputs the corresponding data, automatically draws the Y value curve and Y value, and realizes the printing and storage of the curve file in the form of test sheet. 2, easy to use Both furnaces (front and rear) can be controlled at the same time, or the front furnace can be controlled separately. 3, high measurement accuracy The temperature of the cold end of the thermocouple is automatically compensated, the nonlinearity of the thermocouple is corrected, and all links that may cause errors in the temperature measurement system are automatically compensated, so that the error of the displayed temperature is not more than ±3 ℃. 4, automatic recovery function After the instrument is powered off for a moment, it can automatically restore to the working condition before the power failure when it is powered back again, so as to avoid the sample being scrapped.
Technical parameters:
1, display temperature range: 0-999 ℃, resolution 0.1 ℃ with K thermocouple. 2, display time range: 0-999min, resolution 0.1min. 3, working environment: 5-40℃, relative humidity ≤80%. 4, temperature control: 30 minutes to reach 250℃, 250℃-730℃ between 3℃ per minute. 5. Time display error: no more than 10S within 24 hours. 6, continuous work: 24 hours. 7, cold end compensation: 0 ℃ -60 ℃ 8, pressure sensor: (0 ~ 20)Kg 9, displacement sensor: (0 ~ 200)mm 10, power supply voltage: 220 V (± 10%) 50HZ. 11, load power: ≤ 5KW. 12, overall size (mm) : host: 800×400×580mm; Controller (L×W×H) : 330×290×120mm; 13, weight: host machine 96 kg, controller 7 kg.
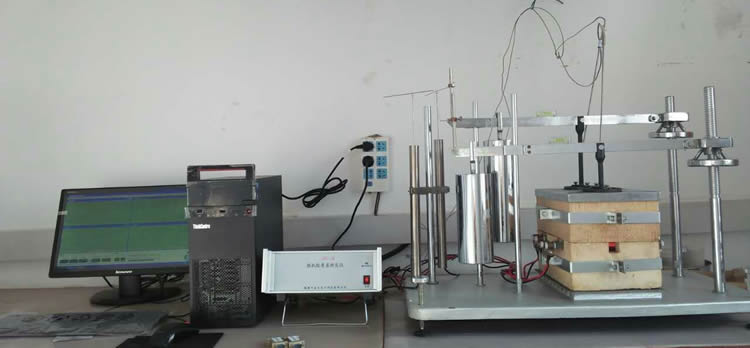
Placement and installation
1. Placement place: (1) Indoor temperature: 0-40 ℃ ventilation; (2) Indoor relative humidity: ≤ 80%; (3) there should be no strong cold, hot air or corrosive air flow indoors; (4) Try to stay away from strong magnetic field equipment.
2, external wiring installation: (1) Power cable: 220V AC power is imported from the rear panel terminal. Note: Live wire and neutral wire cannot be connected inversely. (2) The inlet and outlet lines of the front and rear furnaces must correspond to the marks on the back panel. (3) Thermocouple wiring: The thermocouple should be introduced into the terminal of the thermocouple on the back panel of the instrument through the compensation wire, and attention should be paid to the positive and negative polarity of the thermocouple (the red extremely positive electrode). At the same time, it should be noted that the thermocouple of the two furnaces must correspond to the front and rear furnaces indicated on the back panel of the instrument, and the front and rear cannot be connected incorrectly, otherwise the temperature control is not allowed, and the thermocouple is K-type. (4) Displacement sensor: pay attention to the front and back furnaces do not reverse, the front furnace corresponds to the front furnace, and the rear furnace corresponds to the rear furnace. (5) Ground cable: The ground cable should be connected to the ground cable near the laboratory, and should not be shared with the Central Line of the power supply. (6) Requirements for silicon carbon rods: resistance value between 4 and 12 euros, preferably about 8 euros.
Operation method
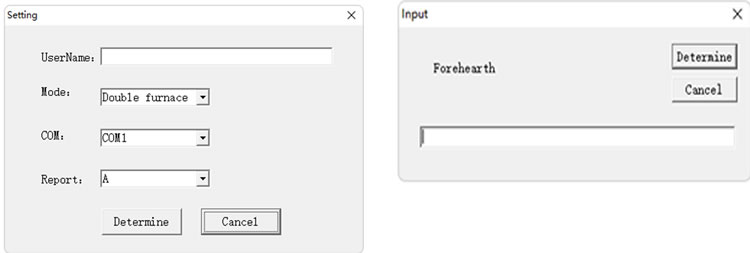
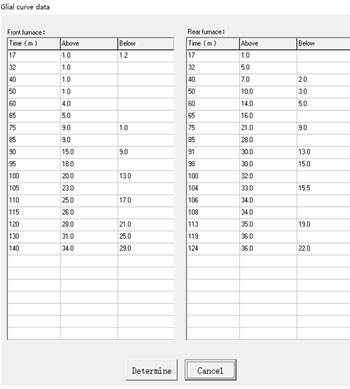
(A). Connect the controller power cord, furnace line, thermocouple line, displacement sensor line, computer connection data line, and fix the coal cup and displacement sensor. (B). Open the microcomputer glial layer application software on the computer desk, click Set (W), and the following window will pop up: 1) User name: can be filled or not 2) Working mode: Click the menu behind the double furnace, you can choose two working modes of double furnace or front furnace. 3) Communication port: Click the menu behind COM1, you can select different COM ports, generally COM1 port, no need to change. 4) report form: there are two printing methods, A and B, generally A, no need to change Once set, click OK. (C) Turn on the microcomputer glial layer power switch, microcomputer glial layer controller power indicator light, and buzzer sound for 3 seconds, wait for the second buzzer sound for 3 seconds to end, open the file (V) → start new measurement (T), input menu:
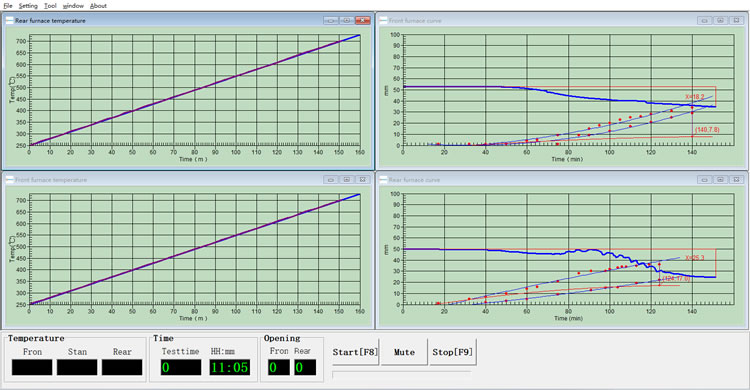
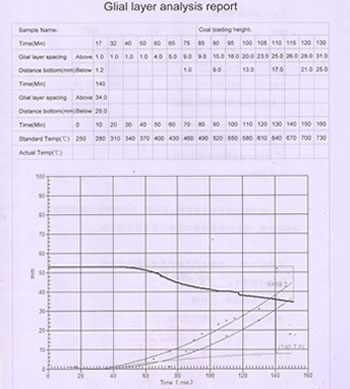
Enter a number, can input or not, and then confirm, if the double furnace, there will be a front furnace, confirm after the rear furnace, and then confirm. The test window appears, click Start [F8] immediately, and the software starts the controller. At this time, the data of front furnace temperature, standard temperature, rear furnace temperature, experiment time, Beijing time, front furnace opening and rear furnace opening appear, and the temperature control begins. In 30 minutes, the furnace temperature rises from room temperature to 250 ℃, and the alarm is given, and the temperature is started to draw and record. The time is re-timed, and the temperature is heated at the rate of 3 ℃ /min, and the alarm is given every 10 minutes to notify the laboratory personnel to record the Y value test time, the upper layer and the lower layer data. When the temperature rises to 730 ℃, the instrument will alarm and automatically keep the temperature at 730 ℃. Open the tool (X) → Y value data input (Y), pop up the glial layer curve data menu, fill in the corresponding space to record the data, and then confirm. (D) At this time, click Stop, the test curve, X value, Y value, will appear on the computer desktop, click File (V) → Save (V) and print (Y), that is, complete the test and print the results. After the test, just turn off the power. Between 350℃ and 600℃, the furnace temperature and the standard temperature shall not exceed ±5℃, and the other time shall not exceed ±10 ℃.
Use precautions
1) The height of the displacement sensor should be 50 mm away from the sensor marked by the black circle of the rod. 2) Boot system automatic detection, after hearing the second alarm tone, can carry out the program operation, otherwise the work is not normal. 3) The glial layer experiment results are saved in the folder “D:/ gliallayerdata”, the default file name is "year month day and coal sample name". 4) Computer time format: Change the time format to HH:mm:ss in the control panel time and area options. In the Power option property of the display properties, turn off the monitor, shut down the hard disk, and change the system standby to "Never". Change the screensaver to "None," then press "Apply" and "Determine."
Determination of plastometric indices of bituminous coal
HR - 4 ash melting point tester HR-3 microcomputer automatic ash fusion tester JC - 2 glial layer tester TQ - 3A type hydrocarbon element analyzer KH - 3 fast ash tester Add 2 - floatation type binding to robben tester Crucible Free Swelling Number Tester
Telephone: 0086-392-3313798 fax: 0086-392-2172001
Zip number : 458030
Address: He nan hebi citizens born technology development Co., LTD.